Brake Part
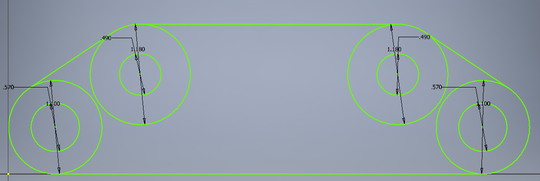
For some reason we had to create a brake bracket with the exact dimensions given to us on a sketch. Weird. To start the process in inventor, I made a rectangle with the length and height of the bracket and used lines to find the centers of the circles. Once I made my circles, I learned how to use a tangent tool. I drew lines past the two circles on either side, and selected the tangent constraint, choosing the line, and then the circle I wanted it to touch. I trimmed off any remaining edges and voila! Just a couple extrusions away from being done in Inventor (lower left). Next, I created the circles that I needed to extrude another .11 inches and drew a line along the bottom of them to get the flat edge. I trimmed away the extra pieces of circle. Used the extrude tool one more time and I was done! Onto Fusion 360.
|
|
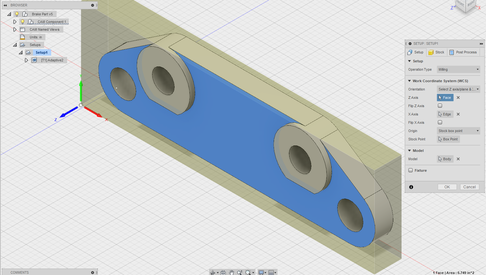
Moving over to Fusion 360, I made a new setup after uploading the inventor file and oriented the file in the correct manner, so that I could place the foam in the mill without any problems. I also selected the lower left corner as my box point so that the mill would start there. Now I had to make my contour.
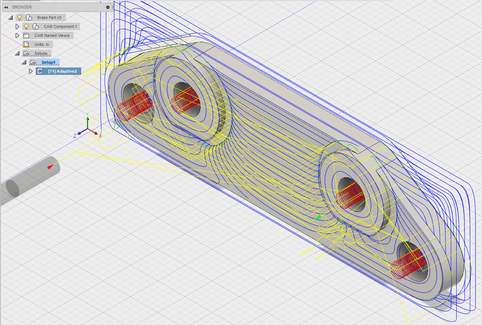
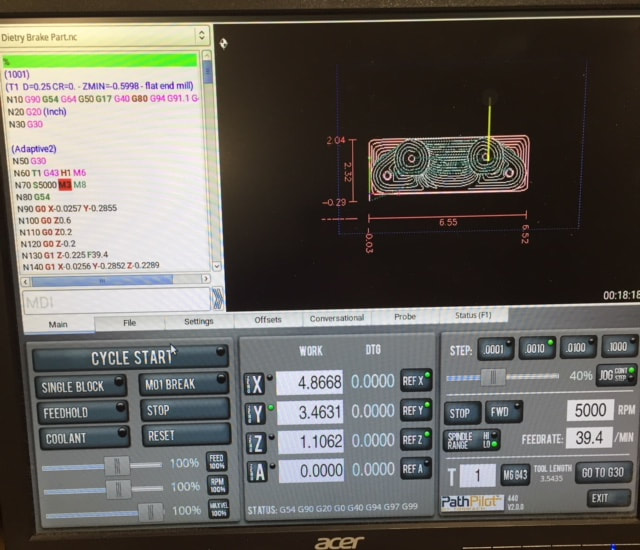
For the type of contour, I selected 3D adaptive clearing instead of the 2D path in the router project. I set up the end mill bit with the appropriate dimensions, and changed spindle speed to 5000 rpm and the feed rate to 39 (as instructed by Mrs. Proctor). I changed 'stock to leave' to 0 and maximum roughing step down to .25 inches. After checking the simulation to see if I had gotten what I expected, I exported my G-code and transitioned to the CNC mill.
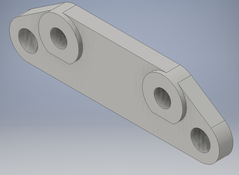
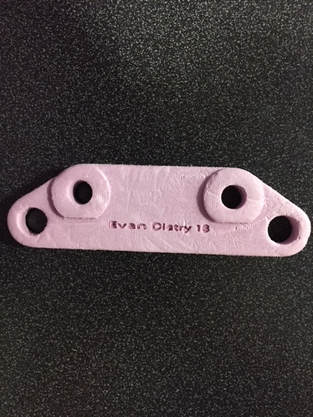
On the mill, it was very similar to the router. I used double sided tape to hold down my foam, and jogged the end mill to the box point and used the z- to basically touch the foam so that the mill would be at the right height, drilling to the correct depth (lower left). I closed the doors to the mill, pressed start, sat around for 20 minutes, and received a useless foam brake part! (sorry) Afterwards I engraved my name for a few extra points, hopefully, and called 'er a day! Final product is below.
|
|
Summary
In this project I learned how to use Fusion a little better, and how a 3D adaptive clearing tool path works differently than a 2D contour. I also learned from Emory to jog the end mill away from the part before ripping the foam off the tape so that nothing is stabbed (duh). Finally, I learned how to use the tangent constraint tool in inventor. Pretty neat!
